Friday, October 6, 2017

Assembly Begins


So I finally got around to reinstalling hte gas tank after cleaning the tank itself.  The tank originally had undercoating on the sides, and was very thick.  I recreated the application to match the original coating that we I preserved on the upper lip that supports the flange of the tank.  I am very pleased with the way that the new coating matches the original in texture and thickness.  On every 64 1/2 tank I've seen, there is a line at the bottom where the original spray nozzle applied a thicker rib near the bottom of the tank, and this came out really true to the original.

Above is most the refinished hardware that attaches the brake and fuel lines to the under-body of the car.  The straps that are common to both brake and fuel lines were finished differently from the later ones depicted in the line assembly manual, these use a pan head hex screws to attach them and are zinc plated.  In addition, the kit from AMK, which is true to what the line assembly manual shows, has different fasteners and different attaching claps.  The clamp at the gas tank, is black painted as it was originially and attaches with a small hex screw.  All the plating is true to the original finishes as found.

Rear bumperette bracket and original hardware, note that he bolt that goes through the top of the gas tank is longer than the one through the rear frame -1 3/16" to be exact.
The screws that hold down the gas tank.  The sealer was applied per the assembly instructions and allowed to squeeze out from under the flange as it did originally.  Black sealer looks just like it did from the factory.  Cool!

Started some cleaning and detailing of the transmission...lots more work to do here.
Original fuel sending unit still works perfectly, and will simply be cleaned and replated.  Note the "F4" date stamp on the upper right flange. Not visible when installed, but I know it's there.  Very cool!


Saturday, August 5, 2017

Rear Axle Assembly

Finished assembly of the differential to the axle housing.  Been a really long time coming but finally finished detailing all of the sub-components and fasteners.  I posted a while back the details of the fastener restoration, the whole thing looks amazing.  Haven't had a chance yet to add the factory markings yet.

Here's another picture of the components laid out so that you can see all that goes into this thing.  Whole differential was completely rebuilt, gears look like new but are actually vintage.

I am really happy with the way that the different parts came out, the the right amount of tumbling, etc. to get these parts looking like they did when the car was first assembled.  None of the metal is painted, it's the natural metal finish that was there originally.


Nest step is to finish recreating factory markings on the leaf springs, and getting them installed.  The axle housing assembly will then get installed followed by insertion of the axles and bolting on the brake backing plates.

Monday, April 24, 2017

Spring Markings

As I progress through the next steps to installing the drive train and engine, I'm going through suspension parts to make sure that everything is done and ready to install.   Gotta have the suspension installed prior to installing the engine of course.  Searched for pictures that I took of the rear leaf springs before restoration because I remembered that there were some interesting paint marks on them that I wanted to recreate prior to installation.  Here they are after soaking in Evaporust.  The top two pictures show the bottom of the uppermost leaf springs, with white paint going the entire length of the spring.  The way its done on the two is very different. 


 The bottom two pictures, above, show a single white dot on each spring.  On the right the dot is partially obscured by where one of the straps rubbed it off, tape measure shows that the one on the left is about 16 inches aft of the centering bolt.  Below is a wider view of the whole spring showing the location of the paint daub.

Front coil springs were black (dipped these in paint many posts ago) now ready to apply the top to bottom chocolate brown stripes on each along with the white stripe on about half the length of each spring, which according to period Ford literature:  "The Load Pounds figure shown indicates the mean load.  Usually, there is a variance of 30 to 50 lbs. plus or minus of the load pounds indicated in the chart.  If the tested load rate is on the mean to low limits, a white stripe is shown in addition to the other identification markings."


 You can see the chocolate brown stripe to the left of the white on the right hand spring above and below.

So apparently the tested load rate for these springs was on the 'mean to low' limit.  The Ford spring chart shows that brown indicated a mean load of 1516 lbs, so these must have tested 30 to 50 lbs. below that.  The 1516 spring rate is the highest available at the time for a Mustang and was indicative of the Special handling package that came on the K code convertibles.  What's interesting is that the chart shows the same spring whether the K code had power steering or manual steering (but power steering wasn't an option for the K codes, supposedly).   So it would make sense, although the chart doesn't specifically indicate it, that a K code convertible without power steering would be expected to weigh-in 30 to 50 lbs less without the power steering equipment so springs that tested to the low end of the mean load rate would be chosen...pretty cool that they were trying to match the springs so accurately to the particular car.  So for this car they chose springs that were in the range of 1461 to 1481 lbs.  With this car being one of the first K code convertibles that the assembly line had seen, they wouldn't have known that there weren't any power steering K-codes - so given what we know about no options for A/C or power steering, we would expect all 64 1/2 K code convertibles to have been delivered from the factory with springs of this type, with the brown and white identification markings.

 Of further interest, the chart shows that the same spring is used on K code convertibles with A/C (again supposedly not an option for K codes), but in combination with a C4DZ-5355-A shim which somehow brought the spring rate to 1491 lbs.


Friday, April 21, 2017

Motor Markings

If you go back a few blog posts, I posted pictures of the original markings on the back of the motor.  I recreated these markings on the back of the motor, once it was finally cleaned -whew!  It was very important to me that these markings be exactly the same as what was on there from the factory originally - even though they won't be visible once the flywheel and bellhousing are reinstalled. Again it's all about things being accurate whether visible or not.  I used a template that I made from a photo of the original makings.  This resulted in a very accurate recreation right down to the hand writing style.  I needed to do this before mounting the block back on the engine stand to finish the build-up.

You'll also notice that I reconditioned and reused the original oil gallery plugs.  They turned out great and are different that what is available to replace them.  Note how the square head rear plugs each have a little bump/raised dot on the top of each one.

 The side hex plugs are not made anymore either, so the originals were restored and reused as well.  Again, these are details that most people would not spend any time on, but this is all tied to my desire for this restoration to be as historically accurate as possible, so here we are again reusing the original parts.  To me, there is just something rare and remarkable about cars that someone spent the extra time and effort to get it absolutely right back to the way is was when the first owner fell in love with the car - and even better when you know that all of the original stuff (that can possibly be preserved) is still on the car, as it was when the first owner drove it.

Thursday, March 30, 2017

Engine Assembly Begins


This cleaning has been WAY more work than I expected.  Because it sat in a junk yard for so long, there was a HUGE amount of gunk to be cleaned out of it.  I went through every oil passage, every nook and cranny of the block, front cover, intake, crank, you name it.  I cleaned everything 2, 3, and even more times until I felt comfortable that I got everything out of it.  I spent cleaning and re-cleaning each fresh oil passage in the engine to ensure that on first start-up clean oil wouldn't be contaminated by stuff that was left in the passages.  Just a huge amount of tedious work.

Anyways, soft water jacket plugs are in now, along with the oil filter adapter.

So the front oil gallery plugs are an interesting subject.  Every engine rebuild book, states that there are  three 1/2" diameter oil gallery plugs on the front of the engine....And there are BUT, there is also, on some of these early 289s, a 1/4" plug to the right of the front cam bearing.  Here's a picture of the original plug.  So glad I removed this and got in here and cleaned, there was a ton of black gunk in behind here.  That was another afternoon of re-cleaning all of the front oil galleries connected to this plug hole.
Just look at all the stuff left behind this plug...and to think some people don't remove this when they do a rebuild.  Makes me wonder about all those "rebuilt" engines on Ebay and such...

Every 289 soft plug kit I've seen fails to include this plug and they are not easy to find.

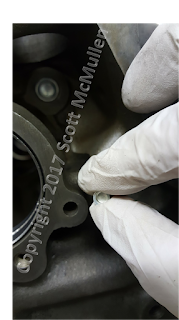
In fact, if you do a compatibility search on most auto parts websites, this 1/4" plug will not come up as a compatible part for ANY 289 engine.  There are a couple of suppliers that make 1/4"diameter plugs, and I was able to obtain a few of them, (extras just in case I messed a couple of them up during install, they are tiny and are easy to get in crooked and or dropped).  There is a later version of the cam thrust plate that covers this and guides oil to the front surface of the cam, but on early cars like this, the thrust plate doesn't cover the hole.

Here the front oil gallery plugs after installation


As I mentioned the crank was also a bear to get clean.   Pic here before polishing and final cleaning showing remnants of orange paint on the counter weights.  Usually expect to see the orange paint on the rear counter weights, but was only able to see paint on front few.

 I wanted the oil holes to be as shiny/clean inside as the journals.  I micropolished the journals on top of what the shop did - turned out great! This thing is as clean or cleaner than the day it went in the motor.

Front cover after cleaning.  This thing spent a long time is 160 degree degreaser, but it came out looking great.  Casting date is April 1964.   No oil fill hole, and no oil fill plug, this was the latest casting design for the front cover at the time.

Inside is nice and shiny, just like when new.


Friday, February 3, 2017

Bill's Story

Bill is the original owner of the car.  I mentioned in an earlier post that I would be providing more details about how Bill acquired the car.   His story is very interesting and provides some unique insite on how excited the public, and particularly "car people" were about the Mustang.  There was a tremendous about of excitement about the Mustang, but even more about the rumored High Performance version that was promised on Jun 1st, 1964.  The pictures below were taken in Jan1974 by Jay, shortly after he acquired the car.  As you can see in the transcript of my first conversation with Bill, and signed by Bill, he stated that he couldn't find any pictures of the car when he had it - I figured I post these instead.  Bill stated that the car originally had a black top, and Bobby the second owner, said that he was the one that put the white top on.

In out first conversation on June 16th 2012, Bill talked about how much fun the car was to drive and how he got the car.  He said that he had been reading about the new High Performance Mustang and had gone to his local dealer and friend to buy one, but was told they wouldn't be available until June.  He told his friend that when they got one he wanted it.  Bill's signed affidavit is below with more detail (this a copy, the original is in a safe deposit box along with the rest of the questionnaire.)


Thursday, February 2, 2017

Finally the Engine

So much effort has gone into this engine.  It's finally time to do the final cleaning and get it assembled.  Here's the back of the engine with the original markings


Here the markings have been enhanced.

Here it is without the white "X", (which I am told is an inspection mark) to better show the yellow text.

Here's what it looks like just before final cleaning.


The intake had a couple of interesting markings, barely visible, but there is an orange check mark over the thermostat recess, and another to the right by the front corner bolt.